
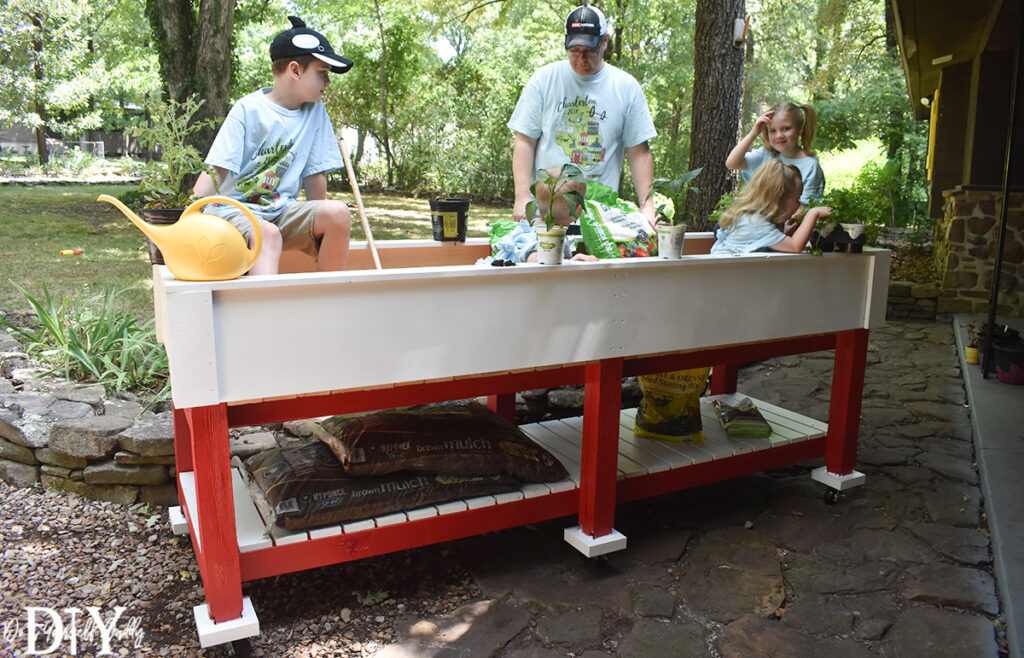
Gardening is fun and is essential for producing healthy, organic food! This DIY mobile elevated planter is great if you’re limited on space for a garden, or if you’d like a much more convenient height to cultivate your plants.
In this article, I’ll show you how to build a large planter that you can wheel around, which is great if you want to move your planter for better sun or water opportunities, and even into a garage during cold winter nights.
Step One: DIY Mobile Elevated Planter Plans
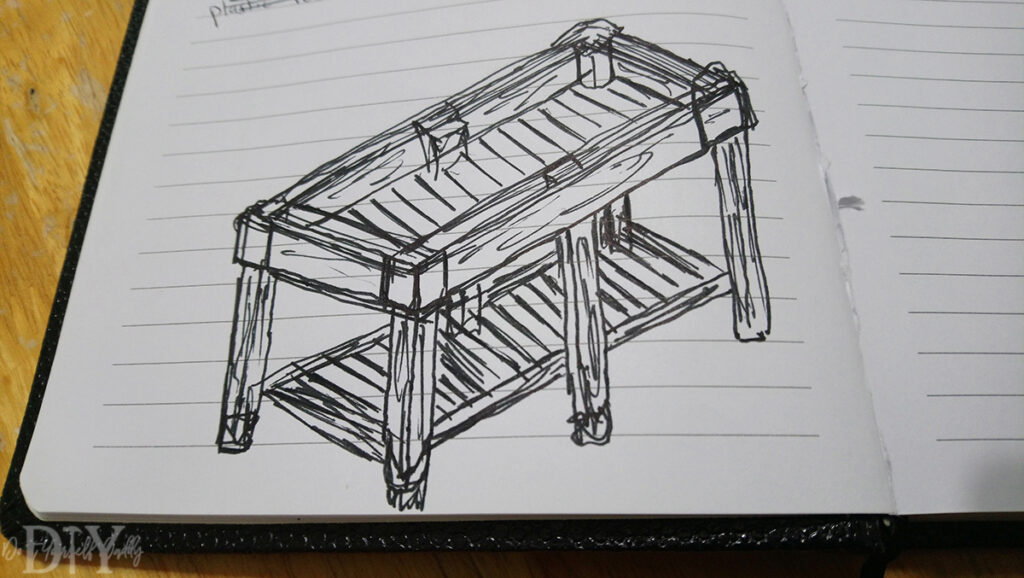
My drawing above is terrible I know, but that’s my original concept for an elevated planter. I knew I wanted to build it fairly heavy duty because no one wants the bottom falling out of a planter over time. I planned for 4×4 posts for the legs and 2x4s for the rest of the structure. Using exterior grade screws and lots of Gorilla Wood Glue made this beast of a planter super strong. The bottom shelf should also hold up under the weight of stored items like soil bags.
The 2x4s that serve as the base of the planter box are unpainted and untreated, so they’ll need to be replaced over time. Because of that, I simply cut them to size and laid them down without fastening them with screws. That way if you need to replace a board, all you have to do is pull it up with ease and replace it with another 2×4.
The 1x12s that serve as the planter box sides are fastened with screws, but they can be removed fairly easy too. Basically, the planter box boards that will rot over time are designed to be easily removed.
Be sure to drill pilot holes before adding screws so you don’t split the wood.
Step Two: Framing The DIY Mobile Elevated Planter
Using a square is a great way to keep your pencil lines nice and straight. I used Gorilla Wood Glue in addition to screws at every place where the wood joined together to give this planter an even stronger hold.
To start out, you’ll need six 4×4 posts cut at 36″, and two 4x4s cut at 8′. Attach these pieces together. Mount the 2x4s to the center of the end 4×4 posts to allow the future cross-2x4s to sit flush on the ends. Next, add two more 2x4s – 12″ from the top of the 4×4 posts to the top of the 2x4s.
The cross 2x4s (25″L) that I mentioned above, they’ll attach to both sides of the planter. Make sure your 8′ horizontal 2x4s are facing inward. Now add four more 2x4s that’ll serve as center bracing.
Finally, add six more 2x4s that will further brace the planter and add support to the planter box and bottom shelf.
Step Three: Time To Paint With The FLEXiO 3000
Time to bring out the awesome Wagner FLEXiO 3000 Sprayer! I’ve used this sprayer on several projects now and am loving it. This time I even used the Detail Finish Nozzle which gave me even more precision on much of this planter. Here’s some quick FLEXiO 3000 details:
o X-Boost® Power Dial – 9 settings for various coatings & precise control
o iSpray® Nozzle – For walls and siding
o 1 ½ quart cup covers up to a 10’ by 12’ wall in one fill
o Material adjustment with numbered settings
o Lock-n-Go® split gun design for quick cleaning
o Sturdy carrying case for easy storage
o Detail Finish Nozzle – For small projects & a smooth finish
o Cleans up in 5 minutes – just five parts to rinse off
First up is a coat of KILZ 2 LATEX. I use KILZ for any painting project because it’s a great sealer and primer. Looking back, I should have left the top of the 4×4 posts unpainted because they lie inside the planter box. I really wanted to leave all wood that touches the dirt to be left untreated.
Adding the BEHR Paint for the first time was exciting for me! I chose red and white (Color codes P140-7 and PPU18-07) for a farmhouse vibe. The white serves as the trim color and the bottom shelf slats were the first to receive it.
Use a small piece of trim wood to determine the gaps in-between the white 1×4 shelf slats to achieve equal spacing on the whole span. Lay out the entire span before nailing it off so you can move the slats around and adjust as needed. I used a nail gun to attach the slats (25″L) to the bottom frame.
Step Four: Adding Casters
You probably noticed already: I designed this planter to be heavy duty! In addition to the weight of the frame itself, the planter box and the shelf underneath is built to hold a lot of weight themselves. The last thing you want is this thing to fall apart, leaving a massive dirty mess.
Therefore, adding wheels is a must if you want to move this thing around, even if it’s just to move it a few inches. I bought 175-pound-rated casters for about $6 each at Home Depot; the convenience factor is worth the expense to me.
Unfortunately, the mounting hole pattern on the casters was an oversight on my part. When I bought them (Home Depot is an hour away from me) I didn’t think to make sure they would line up properly with the bottom of the 4×4 posts… they didn’t. So, after flipping the entire frame over, I added 6×6 blocks on the bottom of the 4×4 posts.
Next came drawing out the mounting hole spacing and drilling the holes. I needed to chisel off some of the 4×4 posts to allow for the bolt alignment. You’ll need to buy the proper bolts, washers, and nuts for the casters (don’t forget locking washers!). Mount the casters using a socket wrench and regular wrench and paint the 6×6 blocks white.
Again, there was a bit of extra work necessary because of my hole pattern oversight, but overall I think the results turned out well.
Step Five: Building The Planter Box
After spraying the 1x12x8s and 1x4x10s with KILZ and the white BEHR paint, I wrapped the 1x12s around the exposed tops of the 4x4s. They are mounted flush to the tops on the 4x4s. The two sides are full 1x12x8s and the ends are cut to size.
Next is the floor of the planter box. I was able to use scrap 2x4s from broken down pallets, which both utilized used wood and saved some money. As you can see, I cut the 2x4s so they cover the entire bottom side-side-to-side (32″L), but did not screw them in place. This is untreated wood so it will rot eventually. If you ever need to replace a 2×4, simply pull it up with ease and replace it with another one!
For the corner trim cap, simply cut pieces from the 1×12 planks, cut a 45-degree angle on the insides, butt them up and nail them off.
Use the 1x4x10s for the top railing, again using 45-degree angles in the corners. I screwed the top railing into the top of the 1×12 sides after measuring to make sure I would hit them center.
At this point you’re pretty much done building! All that was left for me was using a hole punch to knock down any high brad nails and touch up paint. I would lay down a garden liner inside the planter box before adding soil to prevent it from leaking through the gaps.
Total material cost for me was about $250. As usual, I tried to utilize scrap wood wherever possible to save money. Finding free pallets and pallet crates that you can dismantle is a great way to store up free wood for projects like this!
Check out my other work here.
Happy gardening!